| CI/CD and React: Create a pipeline using Heroku and CircleCI | 您所在的位置:网站首页 › staging app › CI/CD and React: Create a pipeline using Heroku and CircleCI |
CI/CD and React: Create a pipeline using Heroku and CircleCI
 Sijuade Ajagunna Follow
Software developer, alt-rock freak. I write sometimes. Interested in learning new things.
CI/CD and React: Create a pipeline using Heroku and CircleCI
Sijuade Ajagunna Follow
Software developer, alt-rock freak. I write sometimes. Interested in learning new things.
CI/CD and React: Create a pipeline using Heroku and CircleCI
February 3, 2021 8 min read 2285 
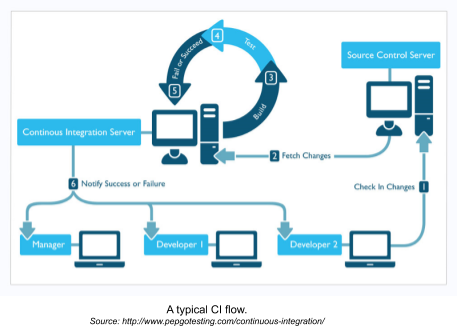
When building React applications, especially larger apps, you will often work with a team of various developers on different Git branches and in different environments (staging, development, production, etc.). Though many hands can make light work, in web development, many individual codes can make for a massive headache. Handling instances like merging branches and integrating new changes into an existing codebase can become what some developers refer to as “integration hell”. Thankfully, these hassles can easily be avoided, or at least minimized, with a robust CI/CD pipeline. Basics: Understanding CI and CDBefore we get started with our demo, let’s review the basics of CI and CD. To refresh your memory, continuous integration (CI) and continuous delivery (CD) are a series of automated steps employed in DevOps. Continuous integrationCI creates a consistent, automated way of integrating code changes multiple members of a dev team into one central repository or project. As stated earlier, large projects usually require developers working on different features and branches which are then merged into one shared branch. When a developer checks in their updated work (for example, through a pull request), those changes are validated by automatically building the application and running different tests, (usually both unit and integration tests), to ensure the changes haven’t broken the application. The team is then immediately notified of the status of the tests and depending on the result, the changes can then be merged into the main work. The diagram below shows typical CI flow:
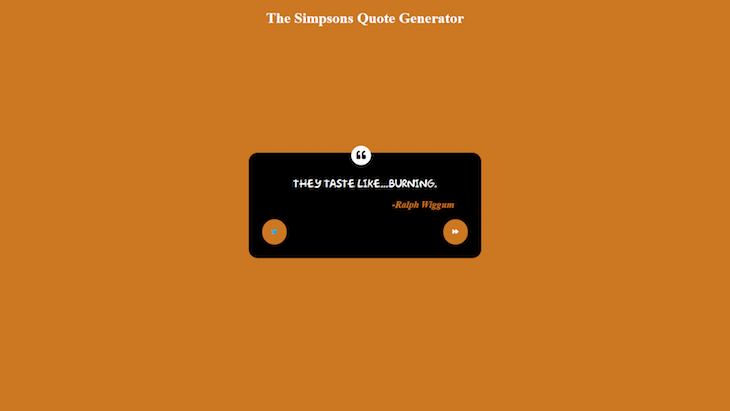
It’s important to note that a good CI system is extremely dependent on the tests written by the developer. You can get started with writing tests in React here. Continuous deliveryAfter continuous integration comes, unsurprisingly, continuous delivery (CD). CD ensures the automatic deployment of your application immediately after a new feature or branch has been successfully merged. Once your unit and integration tests have passed and the branch has been merged with the main shared branch, CD deploys your application to your target environment automatically. This could be a production environment or a staging environment used for live testing. Creating a CI/CD pipeline for a React appNow that we understand the basics of CI and CD, we can put our knowledge into action to create a CI/CD pipeline for a React application. For this demo, it is assumed that you have basic knowledge of git and GitHub. We’ll also be making use of CircleCI for CI/CD and Heroku as our hosting service. Before we get started, here are some basic setup steps: Create GitHub and Heroku accounts if you do not have either already Connect your GitHub account to CircleCI Fork and Clone our example repo for this project. What are CircleCI and Heroku?CircleCI is a CI/CD service that can be integrated into your repository (GitHub, GitHub Enterprise, or Bitbucket). Whenever you commit code into your repo, it creates and runs a pipeline which you create in a config.yml file and gives you a status report on your test. CircleCI is free for open source projects (including projects that are public on GitHub). Heroku is a cloud hosting service. We’ll be hosting our application on Heroku and we’ll configure CircleCI to deploy our application automatically to our Heroku URL whenever it is updated. Setting up the React applicationAfter cloning the application, run the following commands to start it up: npm install npm startYour app should start on port 3000 (if available). If successful, you’ll see a quote generator that looks like this:
This app retrieves quotes from The Simpsons from a file and serves them randomly. You can generate a new quote by clicking the arrow button or tweet a quote by clicking the Twitter icon.  Over 200k developers use LogRocket to create better digital experiences
First, we’ll create a new Heroku application to host our React app. Note that we will be working via the command line for the rest of the deployment. You will need to install the Heroku CLI globally if you haven’t already by running the command: npm i -g herokuYou can then log in to Heroku via the command line (which will open a browser window) by running: heroku loginWe can deploy our React app by using a buildpack. Buildpacks are a set of scripts that are used for compiling apps on Heroku. They make deployment easier and are usually open-source. For our React app, we’ll be using a buildpack for create-react-app. Our next step is to create a Heroku application via the command line using our buildpack with this command (change $APP_NAME to your preferred app name): heroku create $APP_NAME --buildpack https://github.com/mars/create-react-app-buildpack.gitFor this demo, create an application at this URL: https://APP_NAME.herokuapp.com. When you visit the URL, you will be welcomed by the stock Heroku page:
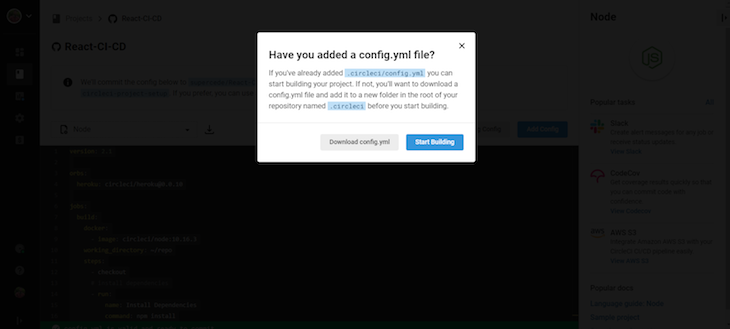
As you may have noticed in the command line, Heroku also creates a git repository for your application. You can confirm this by typing Git remote -v. You’ll see both the origin and Heroku remote branches. At this point, add and commit your code (if it has been modified) and then push to the remote Heroku git repository via the following steps: git add . git commit -m 'commit message here'If you’re currently on the master branch, you can push to Heroku directly using: git push heroku masterIf you aren’t, use this command to push to the Heroku master branch from your current branch (remember to replace ‘$BRANCH_NAME’ with your current branch): git push heroku $BRANCH_NAME:masterHeroku will then push your app and deploy to https://APP_NAME.herokuapp.com. You can visit the website to see your app is live. Now that we have successfully deployed our application to Heroku, it’s time to set up CircleCI. Configure CI/CD in React with CircleCIThe next step is to configure CircleCI. To begin, log in to CircleCI with your GitHub profile. On the Projects side tab, you will see a list of all your public GitHub projects. To set up CircleCI, click “Set up projects.” You should see an editor pop up with options to “Add a config file” or “Use existing config.” Select the option to “Use existing config.” This indicates that you are setting up a configuration file manually and not using the sample displayed.
When you select “Use existing config,” a window like that in the above image should pop up. Click on “Start building.” Because we have not yet set up our configuration property, clicking start building will initiate a build that will initially fail. To set up the correct configuration, you will need to create the environment variables for your Heroku application. You can do this by clicking on the Project Settings button on the top right of your project and then clicking on the Environment Variables side menu.
Here, you’ll set your HEROKU_APP_NAME and HEROKU_API_KEY. Your HEROKU_APP_NAME is the name of your Heroku application (the one you created using a buildpack. Your HEROKU_API_KEY is a key created for you after signing up for Heroku and should be kept secret. You can get your Heroku API Key in your account settings, close to the end of the page. It is hidden but can be shown by clicking the reveal button beside it
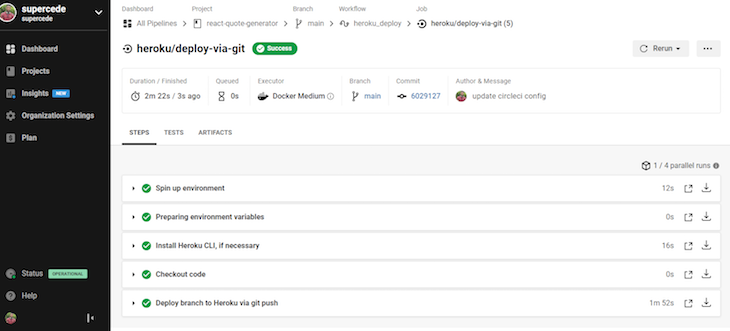
We’ll come back to why you need these later. Now that that’s done, we will set up our CircleCI config locally. In the root of your project folder, create a folder named .circleci (notice the full stop). Inside that folder, we will create a config.yml file. Inside of the .yml file, paste the following code: version: 2.1 orbs: heroku: circleci/[email protected] jobs: build: docker: - image: circleci/node:10.16.3 working_directory: ~/repo steps: - checkout # install dependencies - run: name: Install Dependencies command: npm install - run: name: Run tests command: npm run test workflows: heroku_deploy: jobs: - build - heroku/deploy-via-git: # Use the pre-configured job, deploy-via-git requires: - build filters: branches: only: mainAt first, this code snippet may look like a lot, but when we break it down, it’s actually pretty straightforward. We’ll start with version. This indicates which version of CircleCI we’re running. Each version has features that might not be present in the others, so it’s essential to state the version of your build. For our demo, we’re using version 2.1 Next, orbs. Remember buildpacks for Heroku? Orbs are kind of like that for CircleCI. Orbs are a prepared package that contains reusable CircleCI configuration that can be reused across projects. In our project, we’ll be using the Heroku orb which includes jobs such as heroku/deploy-via-git which deploys your app via a Git repository and helps us skip a lot of configurations. Next up: jobs. Jobs are a collection of steps to run in a CircleCI build process. In our config file, we have created one job (build), which has two steps: installing dependencies and running tests. The Heroku orb we are using also has a job which we use in the workflow section: heroku/deploy-via-git. Finally, workflow refers to a set of rules for defining a collection of jobs and their run order. Workflow also indicates which jobs are required for the other to run. For example, the heroku/deploy-via-git job requires the build job to be successful. Therefore, our application will not be deployed to Heroku unless our tests pass. Since we have also limited the job to our main branch, our code will only be deployed on changes to this branch. Writing tests using React and EnzymeAt this stage, committing and pushing our files as-is will cause an error because our tests will fail. In this section, we will be writing some tests in our App.test.js file using the React testing library and Enzyme. First, install Enzyme: npm i enzymeThen, depending on your React version, you’ll need to install an adapter for Enzyme (see below). You can find more adapters in the npm homepage. # For React 17 npm i @wojtekmaj/enzyme-adapter-react-17 # For react 16.4 npm i enzyme-adapter-react-16Now, add the following tests to App.test.js: import { render } from '@testing-library/react'; import Enzyme, { mount } from 'enzyme'; import App from './App'; import Quotes from './components/Quotes'; // Add your adapter version below import Adapter from '@wojtekmaj/enzyme-adapter-react-17'; Enzyme.configure({ adapter: new Adapter() }); test('displays a quote', () => { render(); const quote = document.querySelector('#text p'); expect(quote).toBeInTheDocument(); expect(quote).not.toBeEmptyDOMElement(); }); it('calls generateRandomQuote prop function when next button is clicked', () => { const generateRandomQuoteFn = jest.fn(); const quote = mount( ); const generateBtn = quote.find('#new-quote'); generateBtn.simulate('click'); expect(generateRandomQuoteFn).toHaveBeenCalledTimes(1); });With our tests set up, we can now commit the code and push to our repository: git add . git commit -m 'add circleci config' git pushThis should trigger another build on CircleCI which should be successful. If so, you will see all green checkmarks, like this:
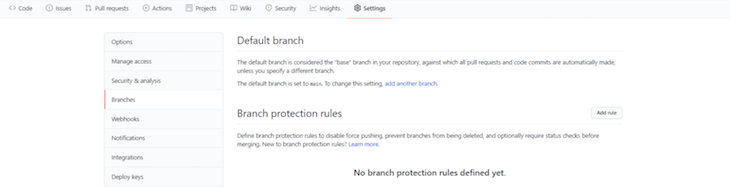
Next, we will make sure that our main GitHub branch is protected by ensuring that pull requests cannot be merged unless our build passes. To do this, on the GitHub repository, go to the settings tab. From there, click on Add Rule in the Branches tab:
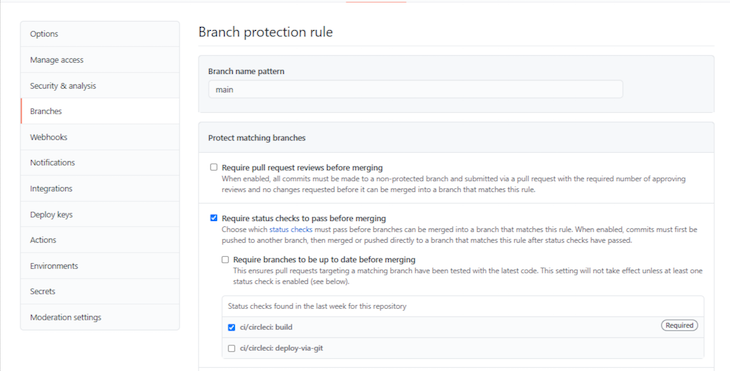
Add main to the Branch name pattern. Under the Require status checks to pass before merging menu, select the ci/circleci: build option:
You can now checkout into a new branch in your repository, create a pull request, and test it out. For example, in the index.css file, you change a CSS value, like background color, to change the background color of the application. Then, commit your changes and create a PR.
Success! We’ve got greens and we can merge! Once we merge our branch into main, the build and heroku/deploy-via-git jobs will start running. If successful, our app will then be deployed to Heroku. You can try the same with failing tests, too. For the complete project with the CircleCI configuration, check out the quote generator demo on GitHub. Final thoughtsIn this tutorial, we have been able to set up a CI/CD pipeline with React. The config file we created is applicable to any and all React applications that we might want to host on Heroku. For applications with different environments, you can create multiple jobs and filter them for specific branches (like we did above with main). The config to do something like that would look like this: version: 2.1 orbs: heroku: circleci/[email protected] jobs: build: docker: - image: circleci/node:10.16.3 working_directory: ~/repo steps: - checkout # install dependencies - run: name: Install Dependencies command: npm install - run: name: Run tests command: npm run test workflows: heroku_deploy: jobs: - build - heroku/deploy-via-git: # Use the pre-configured job, deploy-via-git app-name: $HEROKU_PRODUCTION_APP_NAME requires: - build filters: branches: only: main - heroku/deploy-via-git: # Use the pre-configured job, deploy-via-git app-name: $HEROKU_STAGING_APP_NAME requires: - build filters: branches: only: developNote that HEROKU_PRODUCTION_APP_NAME and HEROKU_STAGING_APP_NAME are environment variables and should be set in CircleCI. ConclusionThe importance of continuous integration and continuous delivery in modern app development cannot be overstated. You can tweak the CircleCI config from here on to suit your app needs or try out other CI/CD tools such as TravisCI, Azure DevOps, and Jenkins. For optimal collaboration with your dev ops team, I recommend using CI and CD to avoid integration nightmares. LogRocket: Full visibility into your production React apps Debugging React applications can be difficult, especially when users experience issues that are hard to reproduce. If you’re interested in monitoring and tracking Redux state, automatically surfacing JavaScript errors, and tracking slow network requests and component load time, try LogRocket.

LogRocket combines session replay, product analytics, and error tracking – empowering software teams to create the ideal web and mobile product experience. What does that mean for you? Instead of guessing why errors happen, or asking users for screenshots and log dumps, LogRocket lets you replay problems as if they happened in your own browser to quickly understand what went wrong. No more noisy alerting. Smart error tracking lets you triage and categorize issues, then learns from this. Get notified of impactful user issues, not false positives. Less alerts, way more useful signal. The LogRocket Redux middleware package adds an extra layer of visibility into your user sessions. LogRocket logs all actions and state from your Redux stores. Modernize how you debug your React apps — start monitoring for free. Share this:TwitterRedditLinkedInFacebook
Sijuade Ajagunna Follow
Software developer, alt-rock freak. I write sometimes. Interested in learning new things.
Uncategorized
#react
« Macros in Rust: A tutorial with examples
Serverless authentication services compared »
|


【本文地址】